Painted night
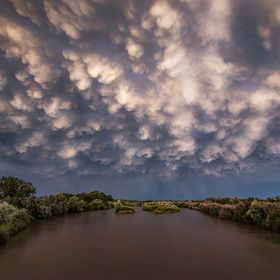
The milky way from the Paint mines interpretive park in Calhan, Colorado.
The milky way from the Paint mines interpretive park in Calhan, Colorado.
Read less
Read less
Views
2009
Likes
Awards
Contest Finalist in After Hours Photo Contest
Peer Award
Absolute Masterpiece
Superb Composition
Top Choice
All Star
Superior Skill
Magnificent Capture
Outstanding Creativity
Jaw Dropping
Top Ranks
Categories


Same photographer Behind The Lens
-
Share to Facebook

-
Share to X

-
 Share to WhatsApp
-
 Share via Email

-
Share to Facebook
-
Share to X
-
Share to WhatsApp
-
Share via Email

-
Share to Facebook
-
Share to X
-
Share to WhatsApp
-
Share via Email

-
Share to Facebook
-
Share to X
-
Share to WhatsApp
-
Share via Email

-
Share to Facebook
-
Share to X
-
Share to WhatsApp
-
Share via Email

-
Share to Facebook
-
Share to X
-
Share to WhatsApp
-
Share via Email

-
Share to Facebook
-
Share to X
-
Share to WhatsApp
-
Share via Email

-
Share to Facebook
-
Share to X
-
Share to WhatsApp
-
Share via Email

-
Share to Facebook
-
Share to X
-
Share to WhatsApp
-
Share via Email

-
Share to Facebook
-
Share to X
-
Share to WhatsApp
-
Share via Email

-
Share to Facebook
-
Share to X
-
Share to WhatsApp
-
Share via Email

-
Share to Facebook
-
Share to X
-
Share to WhatsApp
-
Share via Email

-
Share to Facebook
-
Share to X
-
Share to WhatsApp
-
Share via Email

-
Share to Facebook
-
Share to X
-
Share to WhatsApp
-
Share via Email

-
Share to Facebook
-
Share to X
-
Share to WhatsApp
-
Share via Email

-
Share to Facebook
-
Share to X
-
Share to WhatsApp
-
Share via Email

-
Share to Facebook
-
Share to X
-
Share to WhatsApp
-
Share via Email

Discover more photos See all
-
Share to Facebook
-
Share to X
-
Share to WhatsApp
-
Share via Email

-
Share to Facebook
-
Share to X
-
Share to WhatsApp
-
Share via Email

-
Share to Facebook
-
Share to X
-
Share to WhatsApp
-
Share via Email

-
Share to Facebook
-
Share to X
-
Share to WhatsApp
-
Share via Email

-
Share to Facebook
-
Share to X
-
Share to WhatsApp
-
Share via Email

-
Share to Facebook
-
Share to X
-
Share to WhatsApp
-
Share via Email

-
Share to Facebook
-
Share to X
-
Share to WhatsApp
-
Share via Email

-
Share to Facebook
-
Share to X
-
Share to WhatsApp
-
Share via Email

-
Share to Facebook
-
Share to X
-
Share to WhatsApp
-
Share via Email

-
Share to Facebook
-
Share to X
-
Share to WhatsApp
-
Share via Email

-
Share to Facebook
-
Share to X
-
Share to WhatsApp
-
Share via Email

-
Share to Facebook
-
Share to X
-
Share to WhatsApp
-
Share via Email

-
Share to Facebook
-
Share to X
-
Share to WhatsApp
-
Share via Email

-
Share to Facebook
-
Share to X
-
Share to WhatsApp
-
Share via Email

-
Share to Facebook
-
Share to X
-
Share to WhatsApp
-
Share via Email

-
Share to Facebook
-
Share to X
-
Share to WhatsApp
-
Share via Email

-
Share to Facebook
-
Share to X
-
Share to WhatsApp
-
Share via Email

-
Share to Facebook
-
Share to X
-
Share to WhatsApp
-
Share via Email

Behind The Lens
Location
This photo was taken at the Paint mines Interpretive park in Calhan, Colorado. I am still learning night photography and this was my third attempt at shooting the milky way in the night sky.Time
We arrived at the Paint mines around 2 am after about a 1.5 hour drive from our home town of Pueblo, Colorado. With flashlights in hand we did the easy half mile or so hike down to our desired spots that we had scouted out a few week prior in the day time.Lighting
I wanted the stars to shine bright but also wanted the rocks lit up some to see the detail. I wanted more than just a silhouette with the milky way. This was my very first attempt at light painting and after quite a few tries I found that shinning the flashlight on the rocks behind me gave nice lighting that wasn't too bright. It made it look natural. It was a nice lesson in light painting.Equipment
I used a Canon EOS 70D with a 10-24mm Tamron lens. I used a cheap Sunpak tripod and a wired shutter release. The lighting was from a mag light flashlight shined behind me and the camera.Inspiration
After seeing many incredible photos online of the night sky and the milky way, I wanted to explore night photography and give it a try. I want to have wonderful photos like the pros. I am far from the level of photography that I see but each time I am out with my camera I am learning and improving.Editing
With this photo I wanted the stars to shine bright so I used a pretty high ISO which produced a lot of noise in the rocks. So, I took another photo of the scene with a longer exposure with a lower ISO for the rocks. I then used Photoshop CS6 to blend the 2 photos. One photo for the sky and one photo for the foreground. I did some color correction, some adjustments to make the milky way pop and some burning of the shadows and brightening the highlights in the rocks.In my camera bag
Beside having my Canon EOS 70D, my go to lens is my Tamron 10-24mm. I love the wide angle. I don't have a wide variety of lenses yet. I also keep with me a Canon 35-80mm and a Canon 55-250mm lens. Other items in my camera bag is a shutter release, intervalometer, 2 ND filters, cleaning supplies and a dark piece of welding glass. It is a cheap "homemade" ND filter for those extra long exposures in daylight. Along side my camera bag is my tripod.Feedback
Since I am basically new to night photography and still learning myself a few tips that I could share would be to go to a dark place away from a town. The less light pollution the better. Pay attention to the weather forecasts. A clear sky would be best but sometimes some clouds could make a cool scene. Go out when there is a new moon. Again the darker the sky the better the stars will shine. Try many different things. Different settings, different angles, different lighting and different lighting methods. Experimenting is the best way to learn. Most of all just have fun!